Posts Tagged ‘hummus’

h1

Falafel Hummus

August 6, 2012

Brace yourself, folks: today you about to experience something the internet has never experienced before:

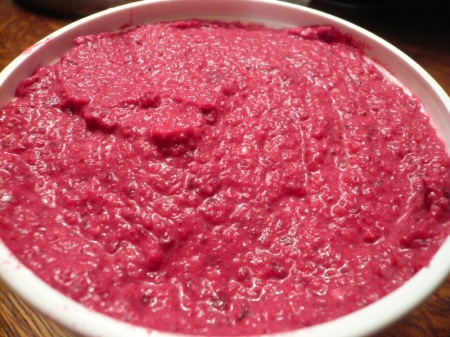
Falafel-flavoured hummus! Okay, I can’t be 100% certain that this has never appeared on the internet before, but my various efforts at Googling (and even Binging for god’s sake (I was getting paranoid)) “falafel hummus”, though turning up many hits, only loaded pages featuring falafel with hummus and the like. As far as I can tell, no one on the internet has yet thought to create and share a falafel-flavoured hummus recipe.

Which is ridiculous, first of all, because falafel and hummus are both totally delicious, and two delicious things in one is always a good idea; second of all, because falafel and hummus even come from the same cuisine, which makes my immediately preceding claim a little less ridiculous; and third and most importantly, because falafel is pretty much hummus already, really just a mere tahini scoop and olive oil splash away.

A bit of backstory: I got the idea for falafel hummus last week while I trying out Oh She Glows’ recent falafel recipe. That didn’t turn out so well, unfortunately (just a problem with getting the mixture to cohere, which was my fault, something with my breadcrumbs I think), but it did make me remark on how similar making falafel is to making hummus, at least at the start before you get to frying. Both dishes start from a chickpea base; falafel is just distinguished by a few extra ingredients (cilantro, parsley, and onion) and a drier texture (more crumbly than smooth). Thus I got to thinking: I could probably make a delicious and unique hummus using the very same falafel recipe I was working with, just by making a few slight modifications: namely, by removing the binders (breadcrumbs and ground flax seeds), including some hummus standards (tahini, olive oil, and water), and adding those extra falafel flavours. And I was right.

The result was easily one of the best hummuses I’ve ever made, and one I’m sure I’ll be repeating it again very soon. The recipe follows the amounts from Oh She Glows’ falafel recipe very closely, so thanks again to Angela for the inspiration. And be sure to refer to my classic hummus guide if you need some basic hummus-making pointers. Enjoy!

Falafel Hummus
(makes about 3 cups)

Ingredients

  • 2 cups chickpeas, cooked
  • 3 cloves garlic, chopped
  • half a small red onion, chopped
  • ¼ cup tightly packed fresh cilantro
  • ¼ cup tightly packed fresh flat-leaf parsley
  • juice and zest of one lemon
  • ⅓ cup tahini
  • 6 tbsp olive oil
  • 6 tbsp reserved chickpea liquid or water
  • ½ tsp cumin
  • ½ tsp salt
  • pinch of red pepper flakes (optional)
  • the other half of your small red onion, minced (optional; see step 2 below)

Instructions

  1. Place all ingredients except the other half of your red onion (if using) in a food processor, and whip everything together. You may not want to add in all the olive oil and reserved chickpea liquid/water from the very start; instead, add it in gradually as you pulse. If the mixture is still looking too thick after all the liquids have been added, add more reserved chickpea liquid/water a little at a time until you reach your desired consistency.
  2. Scoop hummus out into a bowl. If using the other half of your red onion, mix this in now with a spoon. (I feel that this touch makes the mixture even more reminiscent of falafel, but this addition is only recommended if you enjoy the taste of raw onions (as I do).)
  3. Garnish with parsley if you’re being fancy, or not if you’re being lazy.

And that’s all there is to it! Thanks for joining me for this little milestone of internet culinary history. Now go off and make some falafel hummus for yourself and spread the word!

Until we eat again,

Willie

h1

Sweet Potato Curry Hummus

January 2, 2012

Happy New Year, folks!

Sorry I’ve been absent from the blog lately; the end of 2011 was keeping me plenty busy, and I just couldn’t find the time to blog! I’m ready to get back on track now, though, and to celebrate my return—and the new year—I’m here today to share a quick new hummus recipe I came up with this weekend: Sweet Potato Curry Hummus!

I got the idea for this hummus from the success I had with Oh She Glows’s excellent Spicy Curry Butternut Squash Hummus. Wanting to do something similar but a little different and yet still seasonal, I thought sweet potato would make an interesting substitute for the squash, especially if I replaced the tahini with peanut butter. The result was fantastic, although a little thicker than my hummuses usually turn out (and this despite all the water I added!). Anyway, this still turned out delicious. I hope you enjoy it too! (And if you are going to make it, don’t forget to check out my general tips on how to make hummus, if you haven’t read them already.)

Sweet Potato Curry Hummus
(makes about 3 cups)

Ingredients

  • 2 cups chickpeas, cooked
  • 1 medium sweet potato (should end up with 3/4 to 1 cup after it’s roasted)
  • 2 to 3 cloves garlic, chopped
  • 3 tbsp peanut butter
  • 3 tbsp lemon juice
  • approximately 10 tbsp reserved chickpea liquid, or water
  • 1 tsp salt
  • 2 tsp curry powder

Instructions

  1. Start by roasting your potato. Preheat your oven to 400°F or so, and then either: (a) peel and dice your yam, toss in a little bit of oil, salt, and pepper, and then spread out on a parchment paper-lined baking sheet; or (b) leave your yam unpeeled, poke a few times with a fork, and put it on your baking sheet whole. Bake until the flesh is very soft (at least 30 minutes, possibly more), then remove from oven. If using the unpeeled method, wait for the sweet potato to cool, and then scoop out the flesh, discarding the peel.
  2. Now simply whip everything together in a food processor, adding reserved chickpea liquid/water a little at a time until you reach your desired consistency.
  3. Garnish with crushed peanuts and cayenne powder if you’re being fancy, or not if you’re being lazy.

Mmmm. Can’t think of a yummier way to ring in the new year.

Until we eat again,

Willie

h1

Sunchoke (Jerusalem Artichoke) Hummus

December 11, 2011

Hi all!

It’s been busy around here lately at UWEA plaza (that is, my life), but I had to make sure to find some extra time today to quickly share this amazing new hummus recipe I recently came up with: Sunchoke Hummus! (If you don’t already know about the wonders that are sunchokes/Jerusalem artichokes, you’ll probably want to check out my previous post about Sunchoke Soup for a refresher.)

Now I have to admit, I can’t actually take all the credit for this amazing new recipe. In fact, it all started when I (like any obsessive-compulsive blogger) was checking out my blog stats and looking at the search engine terms people had used to reach my blog. One user got here by searching “sunchoke hummus”—but before this post was ever written. (Or was it an internet searcher from… the future?!) I guess Google took him to my Sunchoke Soup page or something, which must’ve disappointed the searcher, but which fortuitously let me in on the searcher’s excellent idea. Sunchokes are so smooth and creamy and have such a wonderful taste, why wouldn’t they work in hummus? So, in a sort of self-fulfilling search engine prophecy sort of way, I decided to come up with my own recipe for Sunchoke Hummus and post it here, both for the searcher and, of course, for you.

But that wasn’t the end of the help I got with this one. After posting my Sunchoke Soup post, I received several comments, including this one, which had the excellent idea of adding a bit of thyme to the soup mix. Thyme struck me as such an excellent complement to the flavour of the sunchokes that I couldn’t resist throwing some in with this hummus as well, and I think it really elevated the dip to new heights!

And thus was Sunchoke Hummus born. Read below for the recipe, and enjoy!

Sunchoke Hummus

Ingredients

  • 1 cup sunchokes, boiled until very soft
  • 2 cups chickpeas
  • 2 cloves garlic
  • 2 tbsp lemon juice
  • 2 tbsp tahini
  • 4 tbsp reserved chickpea liquid (or water)
  • 1 tsp salt
  • 1.5 tsp thyme

Instructions

  1. Put chickpeas, garlic, lemon juice, and tahini in a food processor.
  2. Pulse until mixture becomes smooth. Slowly add reserved chickpea liquid/water a little at  a time, until you get the mixture to your desired consistency.
  3. Season with salt and thyme, adding more to taste.
  4. Empty into a serving bowl and sprinkle with a little extra thyme.

Hope you like this! And, if you’re looking for more excellent hummus recipes, you’d do well to check out Oh She Glows’s recent Spicy Curry Butternut Squash Hummus. It looks sorta like this…

…and it tastes sorta like heaven! Try it out for yourself!

Until we eat again,

Willie

h1

My (New) New Favorite Vegan Pizza Recipe

September 30, 2011

Hi all!

A couple weeks ago, a friend of mine wrote me raving about an excellent vegan pizza she’d made with her friends. The secret behind their magic pie was subbing in hummus for the traditional cheese. The idea of hummus pizza in itself didn’t take me too much by surprise, as I had already tried making it once or twice before. However, whenever I did it I just used hummus as the base—that is, as replacing both the tomato sauce and the cheese. My friend, on the other hand, started with a layer of tomato sauce and then piled the hummus on top of that, and then topped the whole thing off with lots of fresh veggies. Long story short: when I reached the end of her message I was practically drooling in my chair, and I knew I would be returning to hummus pizza once again.

And what a lovely return it was. As I’ve remarked here before, I have a bit of a troubled relationship with vegan pizza. You may think that things would be all hunky-dory now that Daiya has invaded Toronto stores, but here’s the thing: I sorta don’t really love Daiya. Granted, as a vegan cheese substitute, it is outstanding, and amazingly better than anything else on the market that I know of. However, I generally like my food to be as close to its natural state as possible, and the idea of piling a pie high with processed synthetic cheese substitute just rubs me the wrong way. For one thing, it sort of feels like cheating, and at any rate, it’s not what I want my food to be about.

This being the case, things end up getting fairly unconventional when I decide to make pizza. For the last year and a half or so, my go-to pizza formula has utilized a cheesy spread made from mashed up white beans that I once described as “my new favorite vegan pizza recipe“. However, now that I’ve tasted today’s Roasted Pesto & Hummus Pizza, I have to say: I think I have a new new favorite.

My strategy was simple, making use of a couple things I had lying around my fridge, which regular readers will probably recognize. I started by making this pizza dough recipe from Smitten Kitchen, which was easy and straightforward yet unquestionably awesome. The crust came out perfectly crisp and the crumb wonderfully soft; the only thing I’d change next time would be to roll it out a little thinner.

Once my dough was ready and shaped, I started piling on my ingredients. I started with a layer of my new favorite thing to eat: Roasted Tomato Basil Pesto from Oh She Glows (as I’ve raved about here). I tried to keep this layer thin, both because I didn’t want things to get too messy, and because I knew that this pesto packs a lotta punch, flavor-wise. And if anything, I probably could’ve gotten away with using a little less than you see here.

Next I piled on the hummus—Roasted Red Pepper Hummus from Oh She Glows, to be exact (which I’ve raved about here). This hummus is fantastic on its own, but it works really even better on pizza I think, as its strong roasted flavor really complements all the other baked ingredients.

Following this, I added the veggies, keeping it fairly simple with just tiny broccoli florets and what I like to call “beet pepperoni”—that is, a beet sliced on a mandoline’s finest setting. If you haven’t tried this as a pizza topping yet, then you must. I will seriously probably be putting beet pepperoni all my pizzas for as long as I live—it’s just that good.

After this all I had to do was bake it! This took a little longer than I anticipated, and when it came out I could hardly wait to take my first bite!

It was outstanding, and without a doubt my (new) new favorite vegan pizza recipe. I love it when friends give me such excellent ideas.

Until we eat again,

Willie

P.S. And yes, I ate the whole thing.

h1

Classic Hummus Done Right

September 3, 2011

Hi all!

As I’ve said before, I’ve been making a lot of hummus these days, and in the past few months I’ve posted a few of the exciting hummus variations I’ve been coming up with, such as my unbeatable Beet Hummus and my newest hit, Orange Sunflower Hummus. Sometimes, though, it’s nice to go back to the classic formula: you know—chickpeas, tahini, and lemon juice, all mixed together. Or such were my thoughts earlier this week when I was deciding what sort of hummus I should make next. However, even when you’re making standard hummus, there are a few simple tricks I’ve learned over the years that will elevate your dip from ordinary to extraordinary. And so, here they are: four easy tips for classic hummus done right!

1. Use dried chickpeas, not canned!

Whenever I can, I try to use dried beans rather than canned ones in my hummuses. I think the taste difference is indisputable: home cooked beans just taste so much better, and this makes your hummus taste that much better in turn. And although cooking chickpeas yourself is without a doubt more work than simply opening a can, it really isn’t as much work as you’d expect: simply soak the chickpeas for 6 to 8 hours or overnight, and then simmer them for about an hour and a half, until soft.

2. Keep the liquid from those cooked chickpeas!

Hummus recipes usually call from anywhere between 1/4 to 1/2 water. This water is used solely to thin out the dip at the end and get it to the right consistency. However, if you reserve the liquid from the chickpeas you’ve cooked, you can use that instead of water and get the same textural effect while also getting a little added chickpea flavor in there at the same time. Granted, this doesn’t make a big difference, but if you’re cooking your own chickpeas anyway, it’s an easy thing to do, so why not? (And if you do end up using canned chickpeas, you can save the liquid from the can and thin it out with the necessary amount of water.)

3. Use an actual lemon, zested and juiced!

One of the core components of any hummus is some sort of citrus, traditionally lemon, and using hand-squeezed juice from a fresh lemon is obviously the best option here. Plus, if you use an actual lemon, you have the advantage of being able to zest it as well, and pack even more excellent lemon flavor into your dip. It’s totally worth the small extra cost!

4. Instead of raw garlic and olive oil, give garlic butter a try!

Typically, hummus recipes will say to put in a couple cloves of garlic along with a spoonful or two of olive oil, and one simple twist you can do here is to fry up some garlic butter instead. Simply melt 2 tablespoons of vegan butter or margarine in a small saucepan, and saute 6 cloves of chopped garlic for several minutes, making sure not to burn them. Then simply empty the sauteed garlic with the butter into your food processor and mix in with everything else.

So those are my tips! In case you need it, here is the basic formula I use for classic hummus (although you can definitely adjust these ingredient amounts according to taste and pantry/fridge availability):

Classic Hummus Done Right (makes a little over 2 cups)

Ingredients

  • 2 cups cooked chickpeas (about 3/4 cup dried, or 1 can)
  • 1/3 cup tahini
  • juice and zest of 1 lemon
  • 6 cloves garlic, chopped and sauteed in 2 tbsp vegan butter (or 2 cloves raw garlic with 1 tbsp olive oil)
  • 1/4 to 1/2 cup reserved chickpea liquid/water
  • salt to taste

Instructions

Simply whip everything together in a food processor, adding reserved chickpea liquid/water a little at a time until you reached your desired consistency.

Hope you guys liked this tutorial! Have any extraordinary hummus tips of your own? If so, please share them in the comments—me and all my other readers will definitely appreciate them!

Until we eat again,

Willie

h1

Orange Sunflower Hummus

August 25, 2011

Hiya!

For the past several months now, hummus has become a major part of my diet. It’s easy to see why: hummus is tasty, nutritious, and versatile, and it’s also a blast to make at home. Recently I’ve been experimenting with some twists on the classic chickpea-and-tahini model, ranging from my absolutely fabulous Red Bean & Beet Hummus to my less astounding but still successful Chive Edamame Hummus to my celebratory Black & Gold Steelers Hummus. And this week I came up with yet another new hummus sensation, a little dip I’m calling Orange Sunflower Hummus!

It all started when I had some sunflower seed butter left over from a recent batch of sunflowerseed shortbread button cookies (probably my favorite gluten-free cookie recipe, by the way). As I mulled over how best to use what I had left, it occurred to me that I could substitute my sunflower seed butter for the tahini in a hummus (one of my all-time favorite hummuses replaces tahini with peanut butter—so good!). However, I didn’t think the hummus would be all that impressive if that were the only change, so I began thinking about all the other tweaks I could make. And then it hit me: replace the lemon with orange! I wasn’t completely sure it would work at first (orange is obviously a different sort of citrus than lemon, and not as sharply sour), but I was eager to give it a whirl and see how it’d turn out. Thankfully, the results were amazing!

As a final twist, I also decided to make my hummus a little spicy, adding a good dose of crushed red pepper flakes to the mix. This may not be for everyone, but I certainly enjoyed the added kick, which works surprisingly well with the other flavors. But enough talk: here’s what you’ve been waiting for—Orange Sunflower Hummus, as she is made!

Orange Sunflower Hummus

Ingredients

  • 2 cups chickpeas
  • 1/4 to 1/3 cup sunflower seed butter
  • zest and juice of 1 orange
  • 1 tsp agave nectar
  • salt & pepper to taste (plus crushed red pepper flakes, if you like)
  • sunflower seeds (optional)
Instructions
  1. Put chickpeas, sunflower seed butter, orange juice and zest, and agave in a food processor.
  2. Pulse until mixture becomes smooth. Depending on how much juice you got from your orange, you may need to add up to 1/2 cup of water. Just keep adding water in small increments until you get the mixture to your desired consistency.
  3. Season with salt and pepper to taste, and crushed red pepper flakes, if using.
  4. Empty into a serving bowl and top with sunflower seeds.

And voilà! Hummus is so simple. And like I said, it’s versatile, too. Although this hummus is definitely good enough to just eat on its own, one of the ways I’ve been enjoying it is in hummus sandwiches like this one:

If you’re wondering what’s inside, here’s a more revealing view:

It’s really quite simple—just hummus topped with sliced cucumbers and sprouts. Tons of other combinations would also work, of course, so try making it for yourself and creating your own delicious sandwiches, or just enjoy this hummus as a vegetable dip, or added to a salad, or in a nori roll—the possibilities are endless!

Until we eat again,

Willie

h1

Random Instances of Deliciousness (and Cuteness)

September 3, 2009

नमस्ते

As I promised earlier…

LUNCHTIME EXCITEMENT!

BEET HUMMUS!

That’s right! Beet Hummus! I used this recipe, which I found on This is Why You’re Thin! If you haven’t already checked this blog out, I would highly recommend perusing the wonderful assortment of colorful food pics (most of which have the recipes linked). This is a really great hummus! The beety taste was not as intense as the beety color, but it was really fresh and light. I may have added the pepitas for color contrast…

beet hummus closeup

I think, slowly but surely, food blogging is going to bring out the hidden food stylist in me… Only start worrying about me after I whip out a sharpie to make my food look more appealing…

Anyway, I also thought I would take this chance to share some pics of my beloved furry friends!

I think I shall arrange them from oldest to youngest:

Milo butt

This is Milo, or more appropriately, Milo’s behind.

brody

This is my current roommate, Brody.

maya

This is Maya. I caught her in the midst of one of her short and sporadic bouts of ladylike behaviour.

Vasco

This is my other current roommate: Vasco de Hama. He likes pumpkin seeds almost as much as I do! (It’s a little strange how many parts of his food mix are things I love to eat…)

Now, our little blog has not been around for very long, but I was inspired by Carrots n’ Cake to check out the traffic to see what searches people had made that led them to us. I must say that I love the result. Only one search is listed and it is “store bought pierogi dough pockets.” I apologize to whoever searched for this that they probably didn’t quite find what they were looking for… 😉

Until We Eat Again,

Caitlin

p.s. I know I have been a little beet crazy recently but, no worries, I used my last beet on the hummus!